8.2. Pgpool-II + Watchdog Setup Example
This section shows an example of streaming replication configuration using Pgpool-II. In this example, we use 3 Pgpool-II servers to manage PostgreSQL servers to create a robust cluster system and avoid the single point of failure or split brain.
PostgreSQL 17 is used in this configuration example. All scripts have been tested with PostgreSQL 10 and later.
8.2.1. Requirements
We assume that all the Pgpool-II servers and the PostgreSQL servers are in the same subnet.
8.2.2. Cluster System Configuration
We use three servers with Rocky Linux 9 installed and the hostnames of the three servers are server1 server2 and server3 respectively. We install PostgreSQL and Pgpool-II on each server.
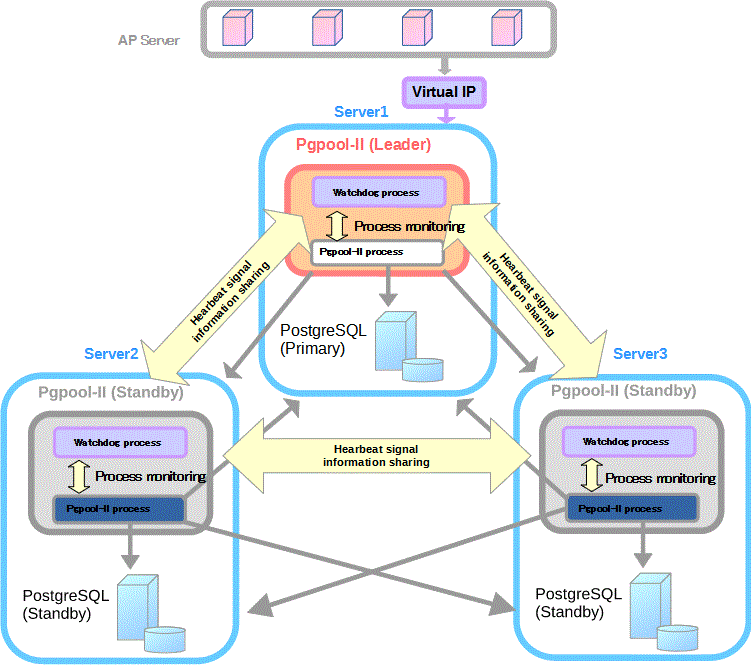
Note: The roles of Leader, Standby, Primary, Standby are not fixed and may be changed by further operations.
Table 8-2. Hostname and IP address
| Hostname | IP Address | Virtual IP |
|---|---|---|
| server1 | 192.168.100.51 | 192.168.100.50 |
| server2 | 192.168.100.52 | |
| server3 | 192.168.100.53 |
Table 8-3. PostgreSQL version and Configuration
| Item | Value | Detail |
|---|---|---|
| PostgreSQL Version | 17.0 | - |
| port | 5432 | - |
| $PGDATA | /var/lib/pgsql/17/data | - |
| Archive mode | off | - |
| Replication Slots | Enabled | In this configuration example, replication slots are automatically created or deleted in the scripts which are executed during failover or online recovery. These scripts use the hostname specified in backend_hostnameX as the replication slot name. See Table 8-5 for more information about the scripts. |
| Async/Sync Replication | Async | - |
Table 8-4. Pgpool-II version and Configuration
| Item | Value | Detail |
|---|---|---|
| Pgpool-II Version | 4.6.0 | - |
| port | 9999 | Pgpool-II accepts connections |
| 9898 | PCP process accepts connections | |
| 9000 | watchdog accepts connections | |
| 9694 | UDP port for receiving Watchdog's heartbeat signal | |
| Config file | /etc/pgpool-II/pgpool.conf | Pgpool-II config file |
| User running Pgpool-II | postgres (Pgpool-II 4.1 or later) | Pgpool-II 4.0 or before, the default user running Pgpool-II is root |
| Running mode | streaming replication mode | - |
| Watchdog | on | Life check method: heartbeat |
Table 8-5. Various sample scripts included in rpm package
| Feature | Script | Detail |
|---|---|---|
| Failover | /etc/pgpool-II/sample_scripts/failover.sh.sample | Run by failover_command to perform failover |
| /etc/pgpool-II/sample_scripts/follow_primary.sh.sample | Run by follow_primary_command to synchronize the Standby with the new Primary after failover. | |
| Online recovery | /etc/pgpool-II/sample_scripts/recovery_1st_stage.sample | Run by recovery_1st_stage_command to recovery a Standby node |
| /etc/pgpool-II/sample_scripts/pgpool_remote_start.sample | Run after recovery_1st_stage_command to start the Standby node | |
| Watchdog | /etc/pgpool-II/sample_scripts/escalation.sh.sample | Optional Configuration. Run by wd_escalation_command to switch the Leader/Standby Pgpool-II safely |
The above scripts are included in the RPM package and can be customized as needed.
8.2.3. Installation
In this example, we install Pgpool-II and PostgreSQL RPM packages with YUM.
Install PostgreSQL from PostgreSQL YUM repository.
[all servers]# dnf install -y https://download.postgresql.org/pub/repos/yum/reporpms/EL-9-x86_64/pgdg-redhat-repo-latest.noarch.rpm
[all servers]# dnf -qy module disable postgresql
[all servers]# dnf install -y postgresql17-server
Since Pgpool-II related packages are also included in PostgreSQL YUM repository, add the "exclude" settings to /etc/yum.repos.d/pgdg-redhat-all.repo so that Pgpool-II is not installed from PostgreSQL YUM repository.
[all servers]# vi /etc/yum.repos.d/pgdg-redhat-all.repo
The following is a setting example of /etc/yum.repos.d/pgdg-redhat-all.repo.
[pgdg-common]
...
exclude=pgpool*

[pgdg17]
...
exclude=pgpool*

[pgdg16]
...
exclude=pgpool*

[pgdg15]
...
exclude=pgpool*

[pgdg14]
...
exclude=pgpool*

[pgdg13]
...
exclude=pgpool*

[pgdg12]
...
exclude=pgpool*
Install Pgpool-II from Pgpool-II YUM repository. To install the required libmemcached library for Pgpool-II, you need to enable crb repository. If you're using Rocky Linux 8, use powertools repository instead of crb repository.
[all servers]# dnf install -y https://www.pgpool.net/yum/rpms/4.6/redhat/rhel-9-x86_64/pgpool-II-release-4.6-1.noarch.rpm
[all servers]# dnf install -y --enablerepo=crb pgpool-II-pg17-*
8.2.4. Before Starting
Before you start the configuration process, please check the following prerequisites.
8.2.4.1. Setting up SSH public key authentication
To use the automated failover and online recovery of Pgpool-II, it is required to configure SSH public key authentication (passwordless SSH login) to all backend servers using postgres user (the default user Pgpool-II is running as. Pgpool-II 4.0 or before, the default user is root).
Execute the following command on all servers to generate a key pair using the RSA algorithm. In this example, we assume that the generated key file name is id_rsa_pgpool.
[all servers]# su - postgres
[all servers]$ mkdir ~/.ssh && chmod 700 ~/.ssh
[all servers]$ ssh-keygen -t rsa -f ~/.ssh/id_rsa_pgpool
Then add the public key id_rsa_pgpool.pub to /var/lib/pgsql/.ssh/authorized_keys file on each server.
After setting SSH, make sure that you can run ssh postgres@serverX -i ~/.ssh/id_rsa_pgpool command as postgres user to login to each server without entering a password.
Note: If you failed to login using SSH public key authentication, please check the following:
Ensure the public key authentication option PubkeyAuthentication are allowed in /etc/ssh/sshd_config:
PubkeyAuthentication yes
If SELinux is enabled, SSH public key authentication (passwordless SSH) may fail. You need to run the following command on all servers.
[all servers]# su - postgres
[all servers]$ restorecon -Rv ~/.ssh
8.2.4.2. Setting up firewall
When connect to Pgpool-II and PostgreSQL servers, the target port must be accessible by enabling firewall management softwares. Following is an example for Rocky Linux 8/RHEL 8.
[all servers]# firewall-cmd --permanent --zone=public --add-service=postgresql
[all servers]# firewall-cmd --permanent --zone=public --add-port=9999/tcp --add-port=9898/tcp --add-port=9000/tcp  --add-port=9694/udp
[all servers]# firewall-cmd --reload
8.2.4.3. Setting up PostgreSQL primary
Set up the PostgreSQL primary server on server1.
First, initialize the database cluster. In PostgreSQL 17, the default directory for creating the database cluster is /var/lib/pgsql/17/data, and this is specified in the environment variable PGDATA in the ~/.bash_profile of the postgres user. Modify it if you want to change the default path.
Run initdb to initialize the database cluster. Specify options such as --encoding and --locale if you need to configure the database encoding and locale settings.
[root@server1 ~]# su - postgres
[postgres@server1 ~]$ /usr/pgsql-17/bin/initdb
Then edit the configuration file $PGDATA/postgresql.conf on server1 as follows. Enable wal_log_hints to use pg_rewind.
[postgres@server1 ~]$ vi $PGDATA/postgresql.conf
listen_addresses = '*'
wal_log_hints = on
Start PostgreSQL on server1.
[postgres@server1 ~]$ /usr/pgsql-17/bin/pg_ctl start
8.2.4.4. Setting up PostgreSQL standby
There are multiple methods to setup a standby server, such as:
use Pgpool-II's online recovery feature (Section 5.11) to automatically setup a standby server.
use pg_basebackup to backup the data directory of the primary from the standby.
Note: If you manually set up standby without using online recovery, please note the following:
You must manually create the replication slots.
Do not specify the -R option when running pg_basebackup. Write primary_conninfo, recovery_target_timeline, and primary_slot_name in $PGDATA/myrecovery.conf, not in postgresql.auto.conf, and add the following to postgresql.conf.
include_if_exists = 'myrecovery.conf'
In this example, we use Pgpool-II's online recovery to setup the standby server in section Section 8.2.8.2 after the configuration of Pgpool-II is completed.
8.2.4.5. Setting up PostgreSQL users
A PostgreSQL user is required to use Pgpool-II's health check and replication delay check features. Because of the security reasons, we create a dedicated user named pgpool for streaming replication delay check and health check. And create a dedicated user named repl for replication. Because online recovery feature requires superuser privilege, we use postgres user here.
Since Pgpool-II 4.0, scram-sha-256 authentication is supported. This configuration example uses scram-sha-256 authentication method. First, set password_encryption = 'scram-sha-256' and then created the users.
Table 8-6. Users
| User Name | Password | Detail |
|---|---|---|
| repl | repl | PostgreSQL replication user |
| pgpool | pgpool | Pgpool-II health check (health_check_user) and replication delay check (sr_check_user) user |
| postgres | postgres | User running online recovery |
[postgres@server1 ~]$ psql
postgres=# SET password_encryption = 'scram-sha-256';
postgres=# CREATE ROLE pgpool WITH LOGIN;
postgres=# CREATE ROLE repl WITH REPLICATION LOGIN;
postgres=# \password pgpool
postgres=# \password repl
postgres=# \password postgres
To show replication_state and replication_sync_state column in SHOW POOL NODES command result, role pgpool needs to be PostgreSQL superuser or in pg_monitor group (Pgpool-II 4.1 or later). Grant pg_monitor to pgpool:
postgres=# GRANT pg_monitor TO pgpool;
postgres=# \q
Note: If you plan to use detach_false_primary(Pgpool-II 4.0 or later), role "pgpool" needs to be PostgreSQL superuser or in pg_monitor group to use this feature.
In this example, assuming that all the Pgpool-II servers and the PostgreSQL servers are in the same subnet and edit pg_hba.conf to enable scram-sha-256 authentication method.
[postgres@server1 ~]$ vi $PGDATA/pg_hba.conf
(Add the following entries)
host    all             pgpool             samenet                 scram-sha-256
host    all             postgres           samenet                 scram-sha-256
host    replication     repl               samenet                 scram-sha-256
8.2.4.6. Creating .pgpass
To allow repl user without specifying password for streaming replication and online recovery, and execute pg_rewind using postgres, we Create the .pgpass file in postgres user's home directory and change the permission to 600 on each PostgreSQL server. This file allows repl user and postgres user without providing a password for streaming replication and failover.
[postgres@server1 ~]$ vi ~/.pgpass
server1:5432:replication:repl:<repl user password>
server2:5432:replication:repl:<repl user password>
server3:5432:replication:repl:<repl user password>
server1:5432:postgres:postgres:<postgres user password>
server2:5432:postgres:postgres:<postgres user password>
server3:5432:postgres:postgres:<postgres user password>

[postgres@server1 ~]$ chmod 600 ~/.pgpass
Copy it to the home directory of postgres user on server2 and server3.
[postgres@server1 ~]$ scp -i ~/.ssh/id_rsa_pgpool -p ~/.pgpass postgres@server2:
[postgres@server1 ~]$ scp -i ~/.ssh/id_rsa_pgpool -p ~/.pgpass postgres@server3:
8.2.5. PCP connection authentication
To use PCP commands PCP user names and md5 encrypted passwords must be declared in pcp.conf in format "username:encrypted password".
In this example, we set PCP username to "pgpool" and password to "pgpool_password". Use pg_md5 to create the encrypted password entry for pgpool user as below:
[postgres@server1 ~]$ echo 'pgpool:'`pg_md5 pgpool_password` >> /etc/pgpool-II/pcp.conf

[postgres@server1 ~]$ cat /etc/pgpool-II/pcp.conf
# USERID:MD5PASSWD
pgpool:4aa0cb9673e84b06d4c8a848c80eb5d0
Since follow_primary.sh script mentioned later must execute PCP command without entering a password, create .pcppass in postgres user's home directory (the home directory of the user Pgpool-II is running as). The format of .pcppass is "hostname:port:username:password".
In this example, we assume that the PCP user is pgpool and the password is pgpool_password.
[postgres@server1 ~]$ echo 'localhost:9898:pgpool:pgpool_password' > ~/.pcppass
[postgres@server1 ~]$ chmod 600 ~/.pcppass
Copy to server2 and server3.
[postgres@server1 ~]$ scp -i ~/.ssh/id_rsa_pgpool -p ~/.pcppass postgres@server2:
[postgres@server1 ~]$ scp -i ~/.ssh/id_rsa_pgpool -p ~/.pcppass postgres@server3:
[postgres@server1 ~]$ exit
8.2.6. Create pgpool_node_id
From Pgpool-II 4.2, now all configuration parameters are identical on all hosts. If watchdog feature is enabled, to distinguish which host is which, a pgpool_node_id file is required. You need to create a pgpool_node_id file and specify the pgpool (watchdog) node number (e.g. 0, 1, 2 ...) to identify pgpool (watchdog) host.
server1
[root@server1 ~]# echo 0 > /etc/pgpool-II/pgpool_node_id
[root@server1 ~]# cat /etc/pgpool-II/pgpool_node_id
0
server2
[root@server2 ~]# echo 1 > /etc/pgpool-II/pgpool_node_id
[root@server2 ~]# cat /etc/pgpool-II/pgpool_node_id
1
server3
[root@server3 ~]# echo 2 > /etc/pgpool-II/pgpool_node_id
[root@server3 ~]# cat /etc/pgpool-II/pgpool_node_id
2
8.2.7. Pgpool-II Configuration
When installing Pgpool-II using YUM, the Pgpool-II configuration file pgpool.conf is installed in /etc/pgpool-II.
Since from Pgpool-II 4.2, all configuration parameters are identical on all hosts, you can edit pgpool.conf on any pgpool node and copy the edited pgpool.conf file to the other pgpool nodes.
8.2.7.1. Clustering mode
Pgpool-II has several clustering modes. To set the clustering mode, backend_clustering_mode can be used. In this configuration example, streaming replication mode is used.
[root@server1 ~]# vi /etc/pgpool-II/pgpool.conf
backend_clustering_mode = 'streaming_replication'
8.2.7.2. listen_addresses
To allow Pgpool-II and PCP to accept all incoming connections, set the following parameters to '*'.
listen_addresses = '*'
pcp_listen_addresses = '*'
8.2.7.4. Streaming Replication Check
Specify replication delay check user and password in sr_check_user and sr_check_password. In this example, we leave sr_check_password empty, and create the entry in pool_passwd. See Section 8.2.7.9 for how to create the entry in pool_passwd. From Pgpool-II 4.0, if these parameters are left blank, Pgpool-II will first try to get the password for that specific user from pool_passwd file before using the empty password.
sr_check_user = 'pgpool'
sr_check_password = ''
8.2.7.5. Health Check
Enable health check so that Pgpool-II performs failover. Also, if the network is unstable, the health check fails even though the backend is running properly, failover or degenerate operation may occur. In order to prevent such incorrect detection of health check, we set health_check_max_retries = 3. Specify health_check_user and health_check_password in the same way like sr_check_user and sr_check_password.
health_check_period = 5
health_check_timeout = 30
health_check_user = 'pgpool'
health_check_password = ''
health_check_max_retries = 3
8.2.7.6. Backend Settings
Specify the PostgreSQL backend information. Multiple backends can be specified by adding a number at the end of the parameter name.
backend_hostname0 = 'server1'
backend_port0 = 5432
backend_weight0 = 1
backend_data_directory0 = '/var/lib/pgsql/17/data'
backend_flag0 = 'ALLOW_TO_FAILOVER'

backend_hostname1 = 'server2'
backend_port1 = 5432
backend_weight1 = 1
backend_data_directory1 = '/var/lib/pgsql/17/data'
backend_flag1 = 'ALLOW_TO_FAILOVER'

backend_hostname2 = 'server3'
backend_port2 = 5432
backend_weight2 = 1
backend_data_directory2 = '/var/lib/pgsql/17/data'
backend_flag2 = 'ALLOW_TO_FAILOVER'
To show replication_state and replication_sync_state column in SHOW POOL NODES command result, backend_application_name parameter is required. Here we specify each backend's hostname in these parameters (Pgpool-II 4.1 or later). Make sure that the value set in backend_application_nameX matches the value set in application_name of primary_conninfo.
backend_application_name0 = 'server1'
backend_application_name1 = 'server2'
backend_application_name2 = 'server3'
8.2.7.7. Failover configuration
Specify the script that will be executed when failover occurs in failover_command. When using three or more PostgreSQL servers, it's required to specify follow_primary_command to synchronize the standby with the new primary. In case of two PostgreSQL servers, the setting of follow_primary_command is not required.
Note: When performing a switchover using pcp_promote_node with switchover option added in Pgpool-II 4.3, if you want to turn the former primary into standby automatically, follow_primary_command is required to be set even if there are two PostgreSQL servers.
Pgpool-II replaces the following special characters with the backend specific information while executing the scripts. See failover_command and follow_primary_command for more details about each character.
failover_command = '/etc/pgpool-II/failover.sh %d %h %p %D %m %H %M %P %r %R %N %S'
follow_primary_command = '/etc/pgpool-II/follow_primary.sh %d %h %p %D %m %H %M %P %r %R'
Note: %N and %S are added in Pgpool-II 4.1. Please note that these characters cannot be specified if using Pgpool-II 4.0 or earlier.
Sample scripts failover.sh and follow_primary.sh are installed in /etc/pgpool-II/. Create failover scripts using these sample files.
[root@server1 ~]# cp -p /etc/pgpool-II/sample_scripts/failover.sh.sample /etc/pgpool-II/failover.sh
[root@server1 ~]# cp -p /etc/pgpool-II/sample_scripts/follow_primary.sh.sample /etc/pgpool-II/follow_primary.sh
[root@server1 ~]# chown postgres:postgres /etc/pgpool-II/{failover.sh,follow_primary.sh}
Basically, it should work if you change PGHOME according to PostgreSQL installation directory.
[root@server1 ~]# vi /etc/pgpool-II/failover.sh
...
PGHOME=/usr/pgsql-17
...

[root@server1 ~]# vi /etc/pgpool-II/follow_primary.sh
...
PGHOME=/usr/pgsql-17
...
Make sure the entry of the PCP user specified in PCP_USER in follow_primary.sh is created in pcp.conf. In this example, we have created in Section 8.2.5
[root@server1 ~]# cat /etc/pgpool-II/follow_primary.sh
...
PCP_USER=pgpool
...
Note: The follow_primary.sh script does not support tablespaces. If you are using tablespaces, you need to modify the script to support tablespaces.
8.2.7.8. Pgpool-II Online Recovery Configurations
Next, configure the required parameters to perform online recovery. Because Superuser privilege in PostgreSQL is required for performing online recovery, we specify postgres user in recovery_user. In this example, we leave recovery_password empty, and create the entry in pool_passwd. See Section 8.2.7.9 for how to create the entry in pool_passwd.
recovery_user = 'postgres'
recovery_password = ''
recovery_1st_stage_command = 'recovery_1st_stage'
Then, we create recovery_1st_stage and pgpool_remote_start in database cluster directory of PostgreSQL primary server (server1).
The sample scripts of online recovery recovery_1st_stage and pgpool_remote_start are installed in /etc/pgpool-II/. Copy these files to the data directory of the primary server (server1).
[root@server1 ~]# su - postgres -c "cp -p /etc/pgpool-II/sample_scripts/recovery_1st_stage.sample \$PGDATA/recovery_1st_stage"
[root@server1 ~]# su - postgres -c "cp -p /etc/pgpool-II/sample_scripts/pgpool_remote_start.sample \$PGDATA/pgpool_remote_start"
Basically, it should work if you change PGHOME according to PostgreSQL installation directory.
[root@server1 ~]# vi /var/lib/pgsql/17/data/recovery_1st_stage
...
PGHOME=/usr/pgsql-17
...

[root@server1 ~]# vi /var/lib/pgsql/17/data/pgpool_remote_start
...
PGHOME=/usr/pgsql-17
...
In order to use the online recovery functionality, the functions of
pgpool_recovery, pgpool_remote_start,
pgpool_switch_xlog are required, so we need to install
pgpool_recovery on template1 of PostgreSQL server
server1.
[root@server1 ~]# psql -U postgres template1 -c "CREATE EXTENSION pgpool_recovery"
Note: The recovery_1st_stage script does not support tablespaces. If you are using tablespaces, you need to modify the script to support tablespaces.
8.2.7.9. Client Authentication Configuration
Because in the section Before Starting, we already set PostgreSQL authentication method to scram-sha-256, it is necessary to set a client authentication by Pgpool-II to connect to backend nodes. When installing with RPM, the Pgpool-II configuration file pool_hba.conf is in /etc/pgpool-II. By default, pool_hba authentication is disabled, set enable_pool_hba = on to enable it.
enable_pool_hba = on
The format of pool_hba.conf file follows PostgreSQL's pg_hba.conf format very closely. Set pgpool and postgres user's authentication method to scram-sha-256. In this example, it is assumed that the application connecting to Pgpool-II is in the same subnet.
[root@server1 ~]# vi /etc/pgpool-II/pool_hba.conf
(Add the following entries)
host    all         pgpool           samenet          scram-sha-256
host    all         postgres         samenet          scram-sha-256
Note: Please note that in Pgpool-II 4.0 only AES encrypted password or clear text password can be specified in health_check_password, sr_check_password, wd_lifecheck_password, recovery_password in pgpool.conf.
The default password file name for authentication is pool_passwd. To use scram-sha-256 authentication, the decryption key to decrypt the passwords is required. We create the .pgpoolkey file in postgres user's home directory (the user Pgpool-II is running as. Pgpool-II 4.0 or before, Pgpool-II is running as root by default)
[root@server1 ~]# su - postgres -c "echo 'some string' > ~/.pgpoolkey"
[root@server1 ~]# su - postgres -c "chmod 600 ~/.pgpoolkey"
[root@server1 ~]# su - postgres -c "scp -i ~/.ssh/id_rsa_pgpool -p ~/.pgpoolkey postgres@server2:"
[root@server1 ~]# su - postgres -c "scp -i ~/.ssh/id_rsa_pgpool -p ~/.pgpoolkey postgres@server3:"
Execute command pg_enc -m -k /path/to/.pgpoolkey -u username -p to register user name and AES encrypted password in file pool_passwd. If pool_passwd doesn't exist yet, it will be created in the same directory as pgpool.conf.
[root@server1 ~]# pg_enc -m -k /var/lib/pgsql/.pgpoolkey -u pgpool -p
db password: (Enter the password for pgpool user)
trying to read key from file /var/lib/pgsql/.pgpoolkey

[root@server1 ~]# pg_enc -m -k /var/lib/pgsql/.pgpoolkey -u postgres -p
db password: (Enter the password for postgres user)
trying to read key from file /var/lib/pgsql/.pgpoolkey

[root@server1 ~]# cat /etc/pgpool-II/pool_passwd
pgpool:AESheq2ZMZjynddMWk5sKP/Rw==
postgres:AESHs/pWL5rtXy2IwuzroHfqg==
8.2.7.10. Watchdog Configuration
Enable watchdog functionality on server1, server2, server3.
use_watchdog = on
Set virtual IP address to delegate_ip. Ensure that the IP address isn't used yet.
delegate_ip = '192.168.100.50'
To bring up/down the virtual IP and send the ARP requests, we set if_up_cmd, if_down_cmd and arping_cmd. Set the netmask and network interface name according to your network environment. The network interface used in this example is enp0s8. Since root privilege is required to execute if_up/down_cmd or arping_cmd command, use setuid on these command or allow postgres user (the user Pgpool-II is running as) to run sudo command without a password.
Note: If Pgpool-II is installed using RPM, the postgres user has been configured to run ip/arping via sudo without a password.
postgres ALL=NOPASSWD: /sbin/ip
postgres ALL=NOPASSWD: /usr/sbin/arping
Here we configure the following parameters to run if_up/down_cmd or arping_cmd with sudo.
if_up_cmd = '/usr/bin/sudo /sbin/ip addr add $_IP_$/24 dev enp0s8 label enp0s8:0'
if_down_cmd = '/usr/bin/sudo /sbin/ip addr del $_IP_$/24 dev enp0s8'
arping_cmd = '/usr/bin/sudo /usr/sbin/arping -U $_IP_$ -w 1 -I enp0s8'
Note: If "Defaults requiretty" is set in the /etc/sudoers, please ensure that the user that Pgpool-II is running as can execute the if_up_cmd, if_down_cmd and arping_cmd command without a tty.
Set if_cmd_path and arping_path according to the command path. If if_up/down_cmd or arping_cmd starts with "/", these parameters will be ignored.
if_cmd_path = '/sbin'
arping_path = '/usr/sbin'
Specify all Pgpool-II nodes information for configuring watchdog. Specify pgpool_portX using the port number specified in port in Section 8.2.7.3.
hostname0 = 'server1'
wd_port0 = 9000
pgpool_port0 = 9999

hostname1 = 'server2'
wd_port1 = 9000
pgpool_port1 = 9999

hostname2 = 'server3'
wd_port2 = 9000
pgpool_port2 = 9999
Configure the method of lifecheck wd_lifecheck_method and the lifecheck interval wd_interval. Here, we use heartbeat method to perform watchdog lifecheck.
wd_lifecheck_method = 'heartbeat'
wd_interval = 10
Specify all Pgpool-II nodes information for sending and receiving heartbeat signal.
heartbeat_hostname0 = 'server1'
heartbeat_port0 = 9694
heartbeat_device0 = ''
heartbeat_hostname1 = 'server2'
heartbeat_port1 = 9694
heartbeat_device1 = ''
heartbeat_hostname2 = 'server3'
heartbeat_port2 = 9694
heartbeat_device2 = ''
If wd_lifecheck_method is set to heartbeat, specify the time to detect a fault wd_heartbeat_deadtime and the interval to send heartbeat signals wd_heartbeat_deadtime.
wd_heartbeat_keepalive = 2
wd_heartbeat_deadtime = 30
This setting is optional. When Watchdog process is abnormally terminated, the virtual IP may be "up" on both of the old and new active pgpool nodes. To prevent this, configure wd_escalation_command to bring down the virtual IP on other Pgpool-II nodes before bringing up the virtual IP on the new leader Pgpool-II node.
wd_escalation_command = '/etc/pgpool-II/escalation.sh'
The sample script escalation.sh is installed in /etc/pgpool-II/.
[root@server1 ~]# cp -p /etc/pgpool-II/sample_scripts/escalation.sh.sample /etc/pgpool-II/escalation.sh
[root@server1 ~]# chown postgres:postgres /etc/pgpool-II/escalation.sh
Basically, it should work if you change the following variables according to your environment. PGPOOLS is a list of hostnames where Pgpool-II is running. VIP is the virtual IP address that is set to delegate_ip. DEVICE is the network interface for the virtual IP.
[root@server1 ~]# vi /etc/pgpool-II/escalation.sh
...
PGPOOLS=(server1 server2 server3)
VIP=192.168.100.50
DEVICE=enp0s8
CIDR_NETMASK=24
...
Note: If you have even number of watchdog nodes, you need to turn on enable_consensus_with_half_votes parameter.
Note: If use_watchdog = on, please make sure the pgpool node number is specified in pgpool_node_id file. See Section 8.2.6 for details.
8.2.7.11. Logging
Since Pgpool-II 4.2, the logging collector process has been implemented. When installed using the RPM packages, the logging collector process (logging_collector) is enabled by default. Log files are output to /var/log/pgpool_log by default. Configure the logging related configuration parameters as needed to meet your requirements.
log_destination = 'stderr'
logging_collector = on
log_directory = '/var/log/pgpool_log'
log_filename = 'pgpool-%a.log'
log_truncate_on_rotation = on
log_rotation_age = 1d
The configurations of Pgpool-II on server1 are completed. Finally, copy the configuration files to server2 and server3.
[root@server1 ~]# scp -p /etc/pgpool-II/{*.conf,*.sh,pool_passwd} server2:/etc/pgpool-II/
[root@server1 ~]# ssh server2 "chown postgres:postgres /etc/pgpool-II/{*.conf,*.sh,pool_passwd}"
[root@server1 ~]# scp -p /etc/pgpool-II/{*.conf,*.sh,pool_passwd} server3:/etc/pgpool-II/
[root@server1 ~]# ssh server3 "chown postgres:postgres /etc/pgpool-II/{*.conf,*.sh,pool_passwd}"
8.2.8. How to use
Let's start to use Pgpool-II.
8.2.8.1. Starting/Stopping Pgpool-II
Starting Pgpool-II
First, let's start Pgpool-II.
Before starting Pgpool-II, the PostgreSQL primary server must be already running. If PostgreSQL primary server is not running, start it first using the following command.
[root@server1 ~]# su - postgres -c "/usr/pgsql-17/bin/pg_ctl start"Start Pgpool-II on server1, server2, server3 by using the following command.
[all servers]# systemctl start pgpool.serviceStopping Pgpool-II
When stopping PostgreSQL, Pgpool-II must be stopped first.
[all servers]# systemctl stop pgpool.service
8.2.8.2. Setting up PostgreSQL standby server
First, we should set up PostgreSQL standby server by using Pgpool-II online recovery functionality.
Connect to Pgpool-II via virtual IP to check the status of backend nodes. As shown in the result, primary server is running on server1, standby servers on server2 and server3 are in "down" status.
[any server]# psql -h 192.168.100.50 -p 9999 -U pgpool postgres -c "show pool_nodes"
Password for user pgpool:
 node_id | hostname | port | status | pg_status | lb_weight |  role   | pg_role | select_cnt | load_balance_node | replication_delay | replication_state | replication_sync_state | last_status_change
---------+----------+------+--------+-----------+-----------+---------+---------+------------+-------------------+-------------------+-------------------+------------------------+---------------------
 0       | server1  | 5432 | up     | up        | 0.333333  | primary | primary | 0          | true              | 0                 |                   |                        | 2023-11-10 15:30:14
 1       | server2  | 5432 | down   | down      | 0.333333  | standby | unknown | 0          | false             | 0                 |                   |                        | 2023-11-10 15:30:14
 2       | server3  | 5432 | down   | down      | 0.333333  | standby | unknown | 0          | false             | 0                 |                   |                        | 2023-11-10 15:30:14
(3 rows)
Before running pcp_recovery_node command, ensure that recovery_1st_stage and pgpool_remote_start scripts exist in the data directory of PostgreSQL primary server (server1).
[any server]# pcp_recovery_node -h 192.168.100.50 -p 9898 -U pgpool -n 1 -W
Password:
pcp_recovery_node -- Command Successful

[any server]# pcp_recovery_node -h 192.168.100.50 -p 9898 -U pgpool -n 2 -W
Password:
pcp_recovery_node -- Command Successful
After executing pcp_recovery_node command, verify that PostgreSQL standby servers are running on server2 and server3.
[any server]# psql -h 192.168.100.50 -p 9999 -U pgpool postgres -c "show pool_nodes"
Password for user pgpool
 node_id | hostname | port | status | pg_status | lb_weight |  role   | pg_role | select_cnt | load_balance_node | replication_delay | replication_state | replication_sync_state | last_status_change
---------+----------+------+--------+-----------+-----------+---------+---------+------------+-------------------+-------------------+-------------------+------------------------+---------------------
 0       | server1  | 5432 | up     | up        | 0.333333  | primary | primary | 0          | false             | 0                 |                   |                        | 2023-11-10 15:30:14
 1       | server2  | 5432 | up     | up        | 0.333333  | standby | standby | 0          | true              | 0                 | streaming         | async                  | 2023-11-10 16:32:33
 2       | server3  | 5432 | up     | up        | 0.333333  | standby | standby | 0          | false             | 0                 | streaming         | async                  | 2023-11-10 16:33:08
(3 rows)
8.2.8.3. Switching leader/standby watchdog
Confirm the watchdog status by using pcp_watchdog_info. The Pgpool-II server which is started first runs as LEADER.
[any server]# pcp_watchdog_info -h 192.168.100.50 -p 9898 -U pgpool -W
Password:
3 3 YES server1:9999 Linux server1 server1

server1:9999 Linux server1 server1 9999 9000 4 LEADER 0 MEMBER  # The Pgpool-II server started first becomes "LEADER".
server2:9999 Linux server2 server2 9999 9000 7 STANDBY 0 MEMBER # running as STANDBY
server3:9999 Linux server3 server3 9999 9000 7 STANDBY 0 MEMBER # running as STANDBY
If the LEADER Pgpool-II on server1 goes down, standby Pgpool-II on server2 or server3 will become the new LEADER.
To verify this behavior, you may stop Pgpool-II service or shutdown the whole system. Here, we stop Pgpool-II service.
[root@server1 ~]# systemctl stop pgpool.service

[root@server1 ~]# pcp_watchdog_info -p 9898 -h 192.168.100.50 -U pgpool -W
Password:
3 3 YES server2:9999 Linux server2 server2

server2:9999 Linux server2 server2 9999 9000 4 LEADER 0 MEMBER    # server2 becomes LEADER
server1:9999 Linux server1 server1 9999 9000 10 SHUTDOWN 0 MEMBER # server1 is stopped
server3:9999 Linux server3 server3 9999 9000 7 STANDBY 0 MEMBER   # server3 is running as a STANDBY
Restart the stopped Pgpool-II on server1 and verify that it is running as a STANDBY.
[root@server1 ~]# systemctl start pgpool.service

[root@server1 ~]# pcp_watchdog_info -p 9898 -h 192.168.100.50 -U pgpool -W
Password:
3 3 YES server2:9999 Linux server2 server2

server2:9999 Linux server2 server2 9999 9000 4 LEADER 0 MEMBER
server1:9999 Linux server1 server1 9999 9000 7 STANDBY 0 MEMBER
server3:9999 Linux server3 server3 9999 9000 7 STANDBY 0 MEMBER
8.2.8.4. Failover
First, use psql to connect to PostgreSQL via virtual IP, and verify the backend information.
[any server]# psql -h 192.168.100.50 -p 9999 -U pgpool postgres -c "show pool_nodes"
Password for user pgpool:
 node_id | hostname | port | status | pg_status | lb_weight |  role   | pg_role | select_cnt | load_balance_node | replication_delay | replication_state | replication_sync_state | last_status_change
---------+----------+------+--------+-----------+-----------+---------+---------+------------+-------------------+-------------------+-------------------+------------------------+---------------------
 0       | server1  | 5432 | up     | up        | 0.333333  | primary | primary | 0          | false             | 0                 |                   |                        | 2023-11-10 15:30:14
 1       | server2  | 5432 | up     | up        | 0.333333  | standby | standby | 0          | false             | 0                 | streaming         | async                  | 2023-11-10 16:32:33
 2       | server3  | 5432 | up     | up        | 0.333333  | standby | standby | 0          | true              | 0                 | streaming         | async                  | 2023-11-10 16:33:08
(3 rows)
Next, stop the primary PostgreSQL server on server1 and verify that failover is performed automatically.
[root@server1 ~]# su - postgres -c "/usr/pgsql-17/bin/pg_ctl -m immediate stop"
After stopping PostgreSQL on server1, failover occurs. PostgreSQL on server2 becomes the new primary and the standby server on server3 is configured as a standby of the new primary.
[any server]# psql -h 192.168.100.50 -p 9999 -U pgpool postgres -c "show pool_nodes"
Password for user pgpool:
 node_id | hostname | port | status | pg_status | lb_weight |  role   | pg_role | select_cnt | load_balance_node | replication_delay | replication_state | replication_sync_state | last_status_change
---------+----------+------+--------+-----------+-----------+---------+---------+------------+-------------------+-------------------+-------------------+------------------------+---------------------
 0       | server1  | 5432 | down   | down      | 0.333333  | standby | unknown | 0          | false             | 0                 |                   |                        | 2023-11-10 17:05:40
 1       | server2  | 5432 | up     | up        | 0.333333  | primary | primary | 0          | false             | 0                 |                   |                        | 2023-11-10 17:05:40
 2       | server3  | 5432 | up     | up        | 0.333333  | standby | standby | 0          | true              | 0                 | streaming         | async                  | 2023-11-10 17:05:51
(3 rows)
server3 is running as a standby of new primary server2.
[any server]# psql -h server3 -p 5432 -U pgpool postgres -c "select pg_is_in_recovery()"
pg_is_in_recovery
-------------------
t

[any server]# psql -h server2 -p 5432 -U pgpool postgres -c "select pg_is_in_recovery()"
pg_is_in_recovery
-------------------
f

[any server]# psql -h server2 -p 5432 -U pgpool postgres -c "select * from pg_stat_replication" -x
-[ RECORD 1 ]----+------------------------------
pid              | 7198
usesysid         | 16385
usename          | repl
application_name | server3
client_addr      | 192.168.100.53
client_hostname  |
client_port      | 40916
backend_start    | 2023-11-10 17:10:03.067241+00
backend_xmin     |
state            | streaming
sent_lsn         | 0/12000260
write_lsn        | 0/12000260
flush_lsn        | 0/12000260
replay_lsn       | 0/12000260
write_lag        |
flush_lag        |
replay_lag       |
sync_priority    | 0
sync_state       | async
reply_time       | 2023-11-10 17:17:23.886477+00
8.2.8.5. Online Recovery
Here, we use Pgpool-II online recovery feature to restore the former primary on server1 as a standby.
[any server]# pcp_recovery_node -h 192.168.100.50 -p 9898 -U pgpool -n 0 -W
Password:
pcp_recovery_node -- Command Successful
Then verify that PostgreSQL on server1 is running as a standby.
[any server]# psql -h 192.168.100.50 -p 9999 -U pgpool postgres -c "show pool_nodes"
Password for user pgpool:
node_id | hostname | port | status | lb_weight |  role   | select_cnt | load_balance_node | replication_delay | replication_state | replication_sync_state | last_status_change
---------+----------+------+--------+-----------+-----------+---------+---------+------------+-------------------+-------------------+-------------------+------------------------+---------------------
 0       | server1  | 5432 | up     | up        | 0.333333  | standby | standby | 0          | true              | 0                 | streaming         | async                  | 2023-11-10 17:22:03
 1       | server2  | 5432 | up     | up        | 0.333333  | primary | primary | 0          | false             | 0                 |                   |                        | 2023-11-10 17:05:40
 2       | server3  | 5432 | up     | up        | 0.333333  | standby | standby | 0          | false             | 0                 | streaming         | async                  | 2023-11-10 17:05:51
(3 rows)